> For the complete documentation index, see [llms.txt](https://help.leadboxer.com/leadboxer/llms.txt). Markdown versions of documentation pages are available by appending `.md` to page URLs; this page is available as [Markdown](https://help.leadboxer.com/leadboxer/guides/creating-your-first-leadboard.md).
# Creating your first LeadBoard
To create a LeadBoard, you click on the 'Create LeadBoard' button and follow these 3 steps to complete:
1. Create LeadBoard
2. Define Stages
3. Import Data
### 1. Create New LeadBoard
There are 4 items we need to create a LeadBoard.
Step 1 of Create new LeadBoard wizard
* Provide a name for your LeadBoard. We recommend a short and descriptive name, so that all users understand what the goal of the board is. eg. Demo signups, LinkedIn campaign leads, EU Leads, etc.
* Set the visibility of this LeadBoard to be visible to only you or anyone that has access to this dataset.
* Optional: Select the [Segment](https://app.gitbook.com/o/-M_uFoDObQpQ4g4wQONe/s/-M_u92JFMboVvSv_dif4/fundamentals/elements/task-lists) from which the matched leads will be automatically imported in this LeadBoard. This import will happen hourly, so if you want to your cards to move automatically based on behaviour we recommend you use Workflow Automation to import leads onto your boards.
{% hint style="danger" %}
We strongly recommend you use or create a new separate Segment and not use the default 'Top Leads' Segment as this will auto import ALL identified leads and would quickly pollute your board and make it unusable.
{% endhint %}
* Enable or disable the Fixed Flow direction. (when enabled, this will prohibit workflow automations to move LeadCards to the left )
* Click Next
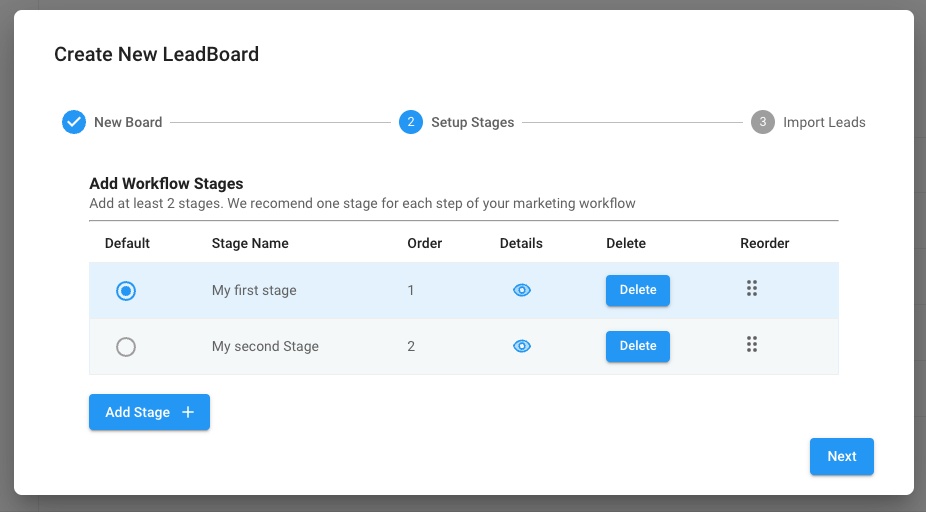
### 2. Define stages
Based on you internal marketing workflow, add the stages so that your LeadBoard matches the steps you have defined to qualify or manage your leads. If you have not done this yet, we recommend you read this tutorial first: Define Your Marketing Workflow.
Step 2 of Create new LeadBoard wizard
* For each workflow step, add a Stage and provide a descriptive name
* Once all steps are defined, make sure they are in the right order (you can drag & drop to change the order)
* Check if the default column is the 'entry' stage. This is the stage where leads will be added by either the auto import or manually.
* Click Next
We recommend to to start simple, with a minimum of 3 stages. You can always revisit and modify if needed later.
### 3. Import Leads
Now that you have created your LeadBoard and defined the stages, you can start managing your leads right away by importing your existing LeadBoxer leads into your new LeadBoard.
Step 3 of Create new LeadBoard wizard
You can choose data from today, last 7 days or last 14 days.
Click import, to perform this step or skip and start with a clean LeadBoard.
Once the LeadBoard has been setup, we recommend you add your [Workflow Automations](/leadboxer/fundamentals/elements/workflow-automation.md).
---
# Agent Instructions
This documentation is published with GitBook. GitBook is the documentation platform designed so that both humans and AI agents can read, navigate, and reason over technical content effectively. Learn more at gitbook.com.
## Querying This Documentation
If you need additional information that is not directly available in this page, you can query the documentation dynamically by asking a question.
Perform an HTTP GET request on the current page URL with the `ask` query parameter, and the optional `goal` query parameter:
```
GET https://help.leadboxer.com/leadboxer/guides/creating-your-first-leadboard.md?ask=&goal=
```
`ask` is the immediate question: it should be specific, self-contained, and written in natural language.
`goal` is optional and describes the broader end goal you are ultimately trying to accomplish on behalf of the user. GitBook uses it to tailor the answer towards what is most useful for that goal.
The response will contain a direct answer to the question and relevant excerpts and sources from the documentation.
Use this mechanism when the answer is not explicitly present in the current page, you need clarification or additional context, or you want to retrieve related documentation sections.