> For the complete documentation index, see [llms.txt](https://help.leadboxer.com/leadboxer/llms.txt). Markdown versions of documentation pages are available by appending `.md` to page URLs; this page is available as [Markdown](https://help.leadboxer.com/leadboxer/integrations/email/individual-emails/g-suite-email-tracking.md).
# G Suite email tracking
We offer a gmail add-in to [track emails sent from gmail](https://help.leadboxer.com/leadboxer/integrations/email/individual-emails/docs.leadboxer.com/article/119-email-tracking-with-gmail-in-leadboxer)
Prefer to use the G Suite version of our email tracking solution? Then install our [G Suite email tracking app](https://gsuite.google.com/marketplace/app/leadboxer/916928181495)
### How to install the Email tracking App for G Suite
Choose between a domain install (for all users in your G Suite account) OR an Individual Install.

***
Give the LeadBoxer plugin access to track the emails

***
Once Installed, go to your G Suite Gmail page and locate the LeadBoxer icon

***
Before you can use the app, you will need to configure the dataset ID.
To do so, select any email in your account to display the LeadBoxer panel contents

***
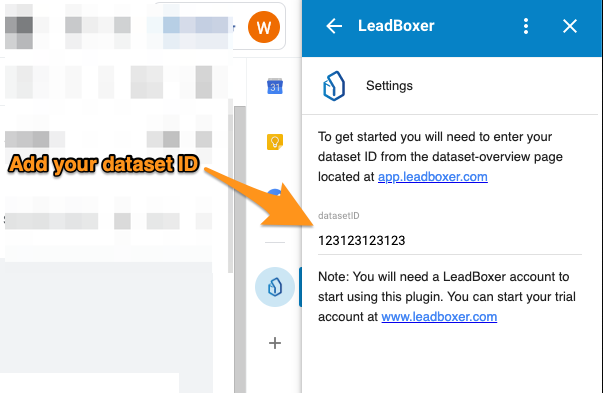
In Settings, add your dataset ID (you can find this in your datasets overview [here](https://app.leadboxer.com/datasets).)
***
Close the panel (click the X)
Now lets start using the plugin, by composing an email and add some tracking:
Click the Compose window, draft your email and click the LeadBoxer icon

***
In this screen you need to provide a name/ subject/ campaign so we can identify the email recipient in LeadBoxer
You can also optionally add a link that we will track automatically

Note: the LeadBoxer website tracking pixel needs to be installed on the domain where the links lead.
***
That's it, now send the email and all Recipient activity will start showing in your LeadBoer account
Happy tracking!
Still need help? [Contact Us](broken://pages/dztCSe7T69Tzi8TKYbcZ) [Contact Us](broken://pages/dztCSe7T69Tzi8TKYbcZ)
Last updated on December 1, 2020
---
# Agent Instructions
This documentation is published with GitBook. GitBook is the documentation platform designed so that both humans and AI agents can read, navigate, and reason over technical content effectively. Learn more at gitbook.com.
## Querying This Documentation
If you need additional information that is not directly available in this page, you can query the documentation dynamically by asking a question.
Perform an HTTP GET request on the current page URL with the `ask` query parameter, and the optional `goal` query parameter:
```
GET https://help.leadboxer.com/leadboxer/integrations/email/individual-emails/g-suite-email-tracking.md?ask=&goal=
```
`ask` is the immediate question: it should be specific, self-contained, and written in natural language.
`goal` is optional and describes the broader end goal you are ultimately trying to accomplish on behalf of the user. GitBook uses it to tailor the answer towards what is most useful for that goal.
The response will contain a direct answer to the question and relevant excerpts and sources from the documentation.
Use this mechanism when the answer is not explicitly present in the current page, you need clarification or additional context, or you want to retrieve related documentation sections.