UTM tags for Google Adwords
What Are UTMs?
UTM parameters are the most common form of link/ad tracking. They are frequently used in social and email campaigns where Google Analytics tends to have a hard time correctly identifying the traffic source. The parameters work around the five standard types that were originally designed around paid clicks — campaign, source, medium, term, and content. If you want an in-depth look at UTMs, either for the first time or as a refresher, get our ultimate guide to UTM building.
How Do UTMs Work in Google Ads?
You can put UTMs into Google Ads final URLs in a few ways. First, you can type them in manually. But because the strings get long, your UTMs are prone to errors when done by hand. So the second way you can go about it — the one we strongly recommend — is to use a UTM link builder tool and apply UTM best practices. It will help you avoid typos and speed up your workflow.
The third approach to take is to use Google Ads tracking templates. This feature automates parameter insertion. It saves you a ton of time and works great with UTM routines
Auto-Tagging in Google Ads
What Is Auto-Tagging for Google Ads?
Google helped develop UTMs, and they’ve developed a tracking method specific to Google Ads: auto-tagging. It’s a shortcut that will make your advertising analytics life a lot easier. Auto-tagging automatically tags URLs with gclid parameters about all of your Google Ads campaigns.
How Does Auto-Tagging Work in Google Ads and Google Analytics?
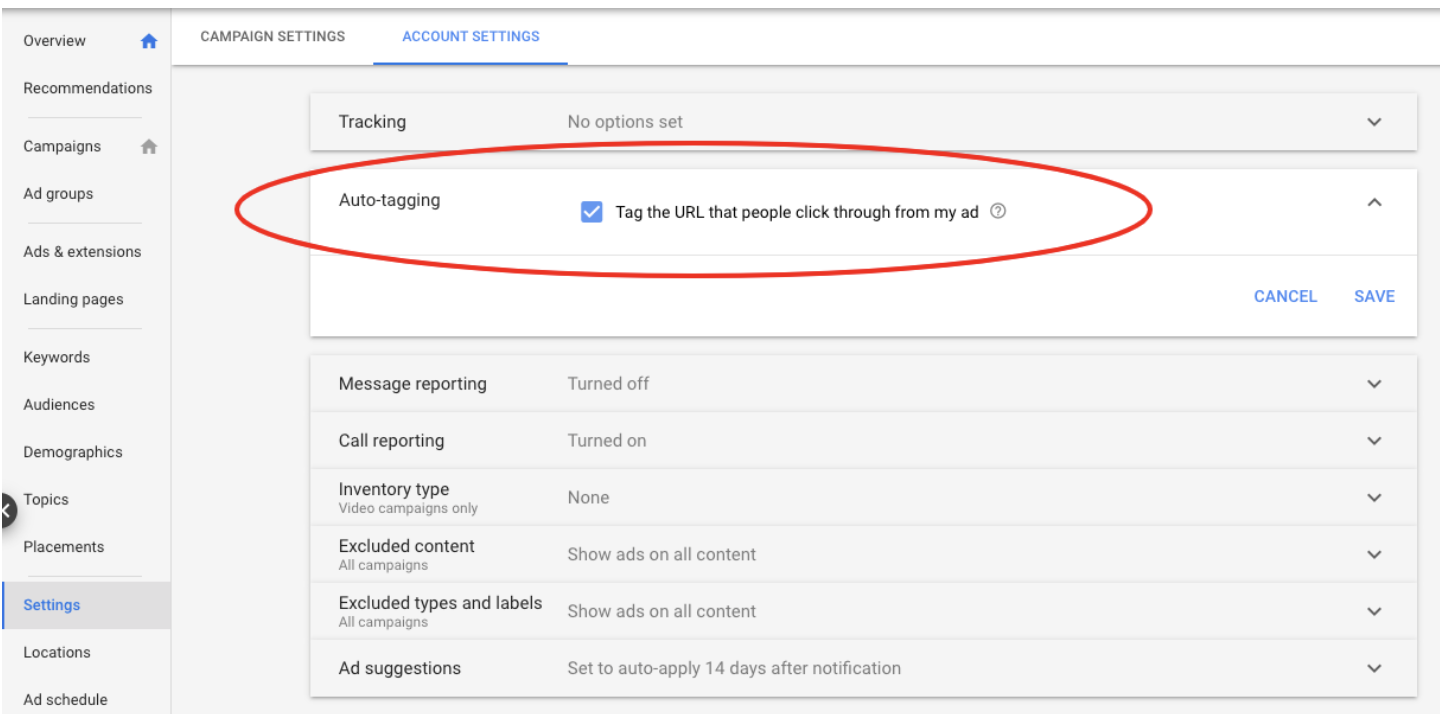
Instead of adding UTM parameters to every destination URL you have, you simply enter the “naked” landing page URL. Google Ads does the rest, literally at the push of a button. See for yourself. The one-click toggle is available in your Google Ads account settings:

How to Correctly Set Up the Hybrid UTM and Gclid Solution for Rich Google Ads Data
There are some conflicting thoughts in the Google Ads community about whether using both auto and manual tagging causes issues. We have studied the topic thoroughly, tested workflows, and reviewed the data. When set up correctly, hybrid tagging provides the richest and most actionable data. Now we’re going to walk you through all you need to know to make your Google Ads tracking amazing.
How to Set Up Hybrid Tagging
The hybrid method requires you to use both regular UTMs and auto-tagging at the same time. For this to work, you’re going to need to have auto-tagging enabled, and you’ll also need to manually tag your ad URLs with UTM tags (ideally through tracking templates). You’ll need to make sure that one little setting inside Google Analytics is set up correctly. You’ll need to make sure that manual tagging (UTM values) doesn’t override auto-tagging (gclid values). To do so, verify the setting by following these steps, per Google Ads help:
Select the Admin tab and navigate to the relevant property.
In the PROPERTY column, click Property Settings.
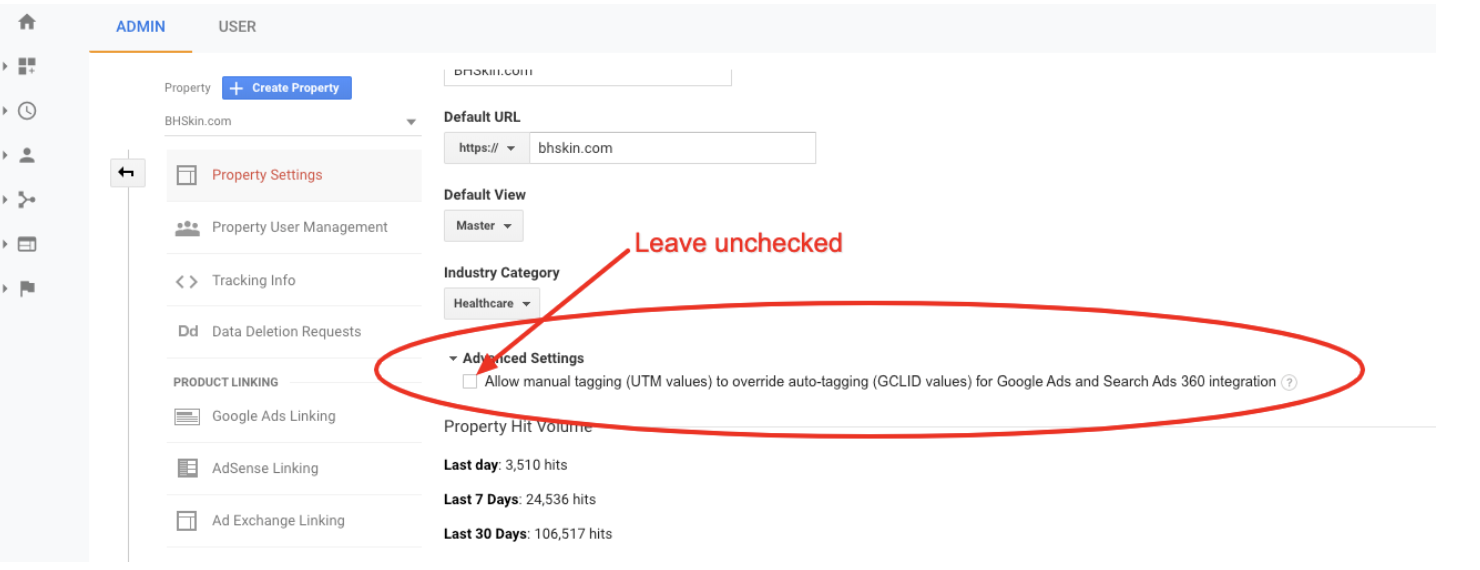
Under Advanced Settings, make sure that the checkbox for “Allow manual tagging (UTM values) to override auto-tagging (GCLID values)” is left blank.
Click Save if you made a change.
This is what the setting should look like:

You typically want to leave the tagging override off because auto-tagging has a lot of value. You can see data points such as keyword, campaign, or spend.
Please note that it is OK to turn the override on and off. So, for instance, if you had the setting turned on for a while, and then you uncheck the box, your Google Ads data in Google Analytics will backfill. This can be used to test data and see how it looks with or without the override. But again, we recommend leaving the tagging override off.
Understanding how the override works is helpful in understanding how UTMs and gclid work together. Per Google Ads Help Center, here’s what happens if you turn on override auto-tagging on:
Google Analytics will use UTM data where possible. Where a parameter is not specified via a UTM, Google Analytics will use the auto-tagged value.
You must specify utm_source for the override to take effect. If utm_source is empty, then Google Analytics will still auto-tag and not respect any of the UTM values specified in the URL.
If you rename a campaign in Google Ads after you’ve enabled the auto-tagging override option, your Google Analytics reports will show multiple entries for the same campaign (both the old and new campaign names). This is because Google Analytics records the campaign name at the time of the Google Ads click and attributes traffic to that campaign name regardless of what the campaign is currently named.
Here’s what happens when you leave the override setting off, per our recommendation:
Gclid values will be prioritized. Your Google Analytics will capture the source, campaign, medium, term and content parameters from gclid. UTMs parameters will be captured by GA for whatever the gclid ones didn’t define.
Your other marketing and analytics tools will only pick up the UTMs. Gclid parameters only work with GA.
Along with intentionally choosing your override setting, you also want to make sure that Google Analytics is linked with your Google Ads account. If you don’t have that in place yet, follow these steps:
Select the Admin tab and navigate to Property, the Product Linking section.
Click Google Ads Linking
Click New Link Group
Select the account(s) you want to link, click Continue
Review the GA Views offered up for the link and turn the pertinent ones ON
Confirm by clicking Link Accounts
Once you have the setup in place and you’re aware of how UTM and gclid parameters work together, you start getting rich data points.
Results of the Hybrid Solution
Here are the values from the UTM parameters that are available in Google Analytics and easy to integrate with your third-party tools:
Campaign holiday-sale
Source google
Medium cpc
Term geek-gifts
Here are the values from gclid parameters provided by auto-tagging, which are only available in Google Analytics:
Final URL /geek-gifts/
Display URL /geek-galore/
Network type search
And many more
On a side note, the hybrid use of UTM and gclid tags can be a part of your advanced UTM naming convention.
Tracking marketing campaign data (UTM tags)Last updated
Was this helpful?
